Custom Event Creations

Tuesday, February 21, 2012

Organizing a Couple Kitchen Cabinets


I am extremely fortunate to have lots of cabinet space in our kitchen.  The downside to all that space is my lack of organization.  I tend to just throw the stuff I don't know what to do with in a cabinet.  And now I have several cabinets with lots of unused junk in them.  I will get to them eventually very soon! :)

I've been stalking researching pinterest & blogs for organizing ideas.  I have 2 cabinets for some food items we don't keep in the pantry.  I thought I'd start with those since they didn't seem too daunting.  Ahemmmmm....no it did not take me 2 hours to clean them out & reorganize.  I know it's a problem I suffer from...indecision.  I freeze up...but seriously does it matter in the grand scheme of things which shelf I put the syrup on?

Here is the cabinet I keep most of our baking supplies in before I cleaned it out.  Not terrible but lots opened bags & containers.  Several expired bags of nuts & coconut from recipes I made once. 


I threw away all the expired food.  And put the big containers of sugar & flour in the pantry closet.  I put the loose sprinkles, icing, cupcake papers, cookie cutters,etc. in clear plastic bins.  Unfortunately, these cabinets aren't very deep & I couldn't find any bins that fit front to back.  So these are not exactly space saving but at least it's organized.   I thought I'd put my glass cake stand in that empty spot but it didn't fit.  :(
Here is the after....


I used a small basket to corral some bags of nuts, baking soda & extracts.


Now I just have to take a bin out when I'm baking rather than rummaging through the cabinet looking for something. 


This food cabinet wasn't too bad.  It holds all the other items we need while cooking like oils, vinegars, etc.  I moved our spices out of this cabinet a while ago to a drawer which works much better for finding what I need. 


I just moved the drink items (crystal light, tea, hot chocolate) to the baking cabinet and the syrup & peanut butter to this one.  And now I have an entire top shelf empty.  Not sure what to store up there as I can't reach it without a step stool and I'm 5'7"!  Again it's a shallow cabinet so a lot of my serving dishes that I don't use often won't fit up there.


Well...that's 2 cabinets done.  Now to tackle the rest of them....and the pantry closet!  Have you organized something lately that makes your life just a little bit more simple?

I've linked up to:


Wednesday, February 15, 2012

Happy Valentine's Day

Happy Valentine's Day!  Although as I sit here writing this post the day is almost over.  And it sure was a busy day for our family.  We had exactly 15 minutes that all 5 of us were together today. For those of you with little kids...enjoy it now because soon the afternoons and evenings will be filled with activities.

We like to give our kids a small gift each Valentine's Day.  When they were little it was a small toy.  Then as they got older we'd give them books or candy.  This year I found these cute hearts filled with their favorite candy at Target. 


After looking at the greeting cards available or lack of good ones...I decided to make my own.  But I wanted to do something creative.  One year I gave my husband a list of 100 things I loved about him.  So in keeping with that theme I decided to write a list of things we love about each of our children.  I wanted them to be able to keep their lists so they would always know how we felt about them.  Since each of my kids LOVE to read I made them bookmarks as their "cards" this year.


I just printed them out & laminated them.  Simple.


 And now they can remember all the things we love about them not just today but everyday.


Hope you enjoyed your day with those you love!


 I sure did!  xoxo


Wednesday, February 1, 2012

Board & Batten Walls in MBR

Hey there!  I linked our master bedroom furniture before & after to Evolution of Style link party yesterday and realized that I never posted about the wall treatment.


before

after


So...here it is FINALLY!  After lots & lots of research I decided that I loved the look of crisp white board & batten wall treatments. 

I used several blogs for inspiration:
 It's the little things that make a house a home
The Yellow Cape Cod     
The Nester

I enlisted my husband to help me with this one.  It was a big project as our bedroom is a good size with an attached sitting room.  We took lots of measurements.  With our notes in hand off to the store we went.  We wanted to keep the costs down and had read that home improvement stores will "rip" the plywood down for you into boards to save us a major step in the process.   Unfortunately, our local Lowes was not able to rip the plywood down for us.  :(

But I was not about to give up so we went a little farther down the highway to Home Depot.  We found a willing employee to help our worthy cause little home improvement project.

As the very kind man in Home Depot continued to cut & stack our boards my dear husband began frantically rechecking our calculations.  Then told him to stop cutting as we had enough boards to cut.  Apparently, we were really "off" on our measurements and had lots of left over wood.

No problem after seeing our completed room our neighbors were inspired to do the same wall treatment in their laundry room and they had all the wood they needed sitting in our garagae...ha ha ha!


We painted the top 1/4 of the walls & the ceiling Benjamin Moore Coventry Gray.


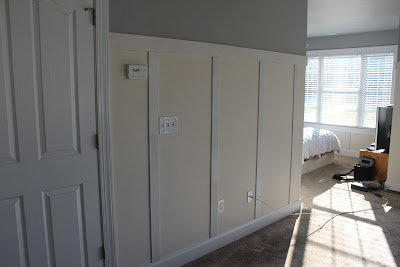
Before we starting hanging the boards in the room.  I sanded & primed all the boards in my garage.  Since we were being cheap Cents-able and using plywood it was pretty rough.


There wasn't much exact measuring involved here.  We were lazy eager and didn't want to waste time with a lot of cutting around outlets and light switches.  We simply lined the boards along each wall  to determine the spacing we needed for each wall.


We used  1/2 inch thick plywood on vertical boards and precut 3/4 inch boards for the horizontal pieces.  We used our nail gun & liquid nails to attach all the boards to the walls. 


Not all the boards lined up perfectly...


..but a little wood putty & caulk will help with that!


 Once all the boards were up.  I was ready to paint and get it done!  But my husband insisted that we caulk all the seams.  What!?!  I asked on both sides of each & every board???  Yup...that's exactly what he meant.   I wanted to just be done at that point but he was right!!!  It made it look so much more finished with the caulking.


Once all the boards were up & caulked I painted with a white semi gloss paint.  And again the final results.  LOVE it!  It was a lot of work but it brightened the room and gave it a lot of character.

  
Between painting the furniture black & adding the board & batten it feels like a different space!